background img

Dedicated to Google and Google products. Curated by Karmi Phúc.

Showing posts with label tips. Show all posts
Screen Shot 2013-09-22 at 19.08.46

Google Chrome's new 'New Tab page' finishes rolling out to everyone today – but what happens if you don't like the new look? Is it possible to 'turn it off'?
Thankfully it is. In this post I'll show you how to restore it without the need to add extensions or fiddle around with bookmarks.

Switch Back to Old Chrome New Tab page

1. Open a new tab in Google Chrome
2. Copy and paste the following into the Chrome omnibox (the URL bar) and hit enter:
3. Turn off the 'Instant Extended API'  by clicking the drop-down menu and selecting the 'Disable' option.
4. Click the 'Relaunch Chrome' button that appears towards the bottom of the window.
You should now see the familiar giant speed dial of the pre-change New Tab Page:
Screen Shot 2013-10-01 at 22.15.06

Notes

Google may remove or disable the option to 'switch off' the latest version of the NTP at some point in the future. So far there's nothing to suggest that they will do this but the chance remains.

Source: http://www.omgchrome.com/get-back-old-chrome-new-tab-page/

Don’t Like Chrome’s Revamped New Tab Page? Here’s How Switch Back to The Old Design

Screen Shot 2013-09-22 at 19.08.46

Google Chrome's new 'New Tab page' finishes rolling out to everyone today – but what happens if you don't like the new look? Is it possible to 'turn it off'?
Thankfully it is. In this post I'll show you how to restore it without the need to add extensions or fiddle around with bookmarks.

Switch Back to Old Chrome New Tab page

1. Open a new tab in Google Chrome
2. Copy and paste the following into the Chrome omnibox (the URL bar) and hit enter:
3. Turn off the 'Instant Extended API'  by clicking the drop-down menu and selecting the 'Disable' option.
4. Click the 'Relaunch Chrome' button that appears towards the bottom of the window.
You should now see the familiar giant speed dial of the pre-change New Tab Page:
Screen Shot 2013-10-01 at 22.15.06

Notes

Google may remove or disable the option to 'switch off' the latest version of the NTP at some point in the future. So far there's nothing to suggest that they will do this but the chance remains.

Source: http://www.omgchrome.com/get-back-old-chrome-new-tab-page/

Screenshot 2014-01-13 17.41.16
For a mammoth corporation, Google still keeps a legitimate sense of humor. Take a look at these seven sneaky Google hacks guaranteed to make you smile:

Full story at Buzzfeed.
More about Google.

Source: http://ho lykaw.alltop.com/seven-google-hacks-that-you-probably-dont-know-about-video

7 Google hacks that you probably don’t know about [video]

Screenshot 2014-01-13 17.41.16
For a mammoth corporation, Google still keeps a legitimate sense of humor. Take a look at these seven sneaky Google hacks guaranteed to make you smile:

Full story at Buzzfeed.
More about Google.

Source: http://ho lykaw.alltop.com/seven-google-hacks-that-you-probably-dont-know-about-video

blogAccessibility
Like many web professionals, I use Google Docs every day to create and share information. It's a fantastic suite of tools that's perfect for collaborating with your coworkers and interacting with clients. In fact, I think mastering Google Docs has become an essential professional skill.
At Treehouse, we use Google Docs documents and spreadsheets for everything from writing video scripts to analyzing data and statistics. I'm always looking for new tips and exploring the menus, because in a tool that I use every day, small efficiencies can add up to big time savings. In this post, I'll share a few uncommon Google Docs tips I've learned over the last few years that will make you into a document-wrangling, cowboy-ninja, spreadsheet-wizard… person.

1. Show all keyboard shortcuts.

Using the mouse to click on things may feel easy, but it's slow. Keyboard shortcuts are one of the fastest ways to get better at any piece of software (especially StarCraft). Whether you're viewing a spreadsheet, a doc, or you're in the list of documents, you can bring up a full list of shortcut keys. Just use the following (you guessed it) keyboard shortcut:
  • On Mac, press ⌘ + /
  • On Windows, press Ctrl + /
When you hit these keys, you should get a contex tual overlay that gives you the hotkeys for the current view; they're different for each app. It looks something like this:

2. Use Gmail shortcuts in the list view.

If you've mastered the shortcuts in either Gmail or the Google Docs list view, then you've actually mastered both. When you're traversing lots of documents, it's often helpful to make some bulk edits or star some documents to find them quickly later.
Here are the most important keys for navigating the list view:
  • J  Navigate to the next item in the list
  • K  Navigate to the previous item in the list
  • X  Select/unselect an item
  • S  Star/unstar an item

3. Free yourself from distraction and edit fullscreen.

If you need to stay hyper-focused on a document in a distraction free environment, this is for you. In a document, go to the View menu and select the Full screen option.
A screenshot of the View menu in Google docs
The controls will disappear so that you can focus on your content. I recommend setting your browser to full screen for maximum effect. To get out of fullscreen mode, simply press the Esc key.

4. Hack the custom header styles to quickly add formatting.

When you're editing a Google document, it's helpful to create headings so that each section of your writing is clearly defined. The default headings are good for most purposes, but if you frequently need to apply special formatting, you can make your own "headings" and apply them to any inline text. For example, I use the special headings to highlight parts of Treehouse video scripts that include motion graphics, special camera moves, blocking, and computer code.
A screenshot of the Title menu in Google Docs.
To create a new header style, simply format your text how you'd like and highlight it. Then go to the Title menu, click one of the right facing arrows next to a header, and select Update 'heading X' to match with X being the header number.
Then, when you need to apply the same formatting, you can simply set the text to o ne of the title styles in the menu as you would normally.
Note: This will only apply to one document at a time, so don't worry about 'messing up' the default styles for other documents or other people in your organization.

5. Get started with a template.

Google maintains a directory of templates that you can use to get a jump start on your next document. There's a pretty huge selection and it's easy to filter and sort. Whether you're setting up a personal finance spreadsheet or writing a resume and cover letter, there's probably a template in there that can seriously cut down on your setup time.

6. Automagically create a table of contents.

When I create outlines for new courses on Treehouse, the documents tend to get pretty lengthy. Fortunate ly, if you structure your document using the various header levels in the Title menu, Google Docs can automatically generate a table of contents for you. This TOC allows you to jump to any part of the document, making navigation quick and easy for long documents.
In a document with several headings, place your insertion point at the top of the document. Then, go to the Insert menu and click Table of contents to add a TOC. Here's a picture of the finished result:
Screenshot of a Google Docs table of contents.
Note: This probably won't work properly if you use the header hack in tip 4 to format inline text. I only use TOCs for creating outlines and not scripting videos.

7. Use conditional formatting to color spreadsheets.

Maybe y ou're not surprised that spreadsheets in Google Docs are capable of coloring cells based on conditional formatting. Yet for some reason, very few people know about this feature when I tell them. If you're working with numerical data or dates, coloring cells can help you quickly distill and comprehend large datasets.
I created an example data set that represents a traditional classroom with test scores (and in the process, I also learned about the random number generators in the function list). Let's say you're a teacher, and you want to visually identify students that scored 75 or below on a test. To do this, hover over the column header and click the arrow icon that appears to bring up a menu. Then click the Conditional formatting… option towards the bottom.
Note: In the image below, there are numbers in column B that are covered by the menu.
Screenshot of the conditional formatting menu in Google spreadsheets.
When the conditional formatting modal appears, you can add rules that will color the cells. In the image below, you can see what these rules look like for our example. Any numbers at 75 or below will be highlighted in yellow. Everything else will be green.
Screenshot of the conditional formatting modal in Google spreadsheets.
Here's what the data looks like with the added color. Even better, when we sort Column B, we'll see a visual that depicts the ratio between low scores and high scores. The block of yellow cells will be set against the block of green cells. Conditional formatting is like a grappling hook for climbing the DIKW Pyramid. It's a tool that can help you make the leap from data to useful information.
Screenshot of a Google spreadsheet with conditionally formatted cells.

8. Extrapolate sets of related terms.

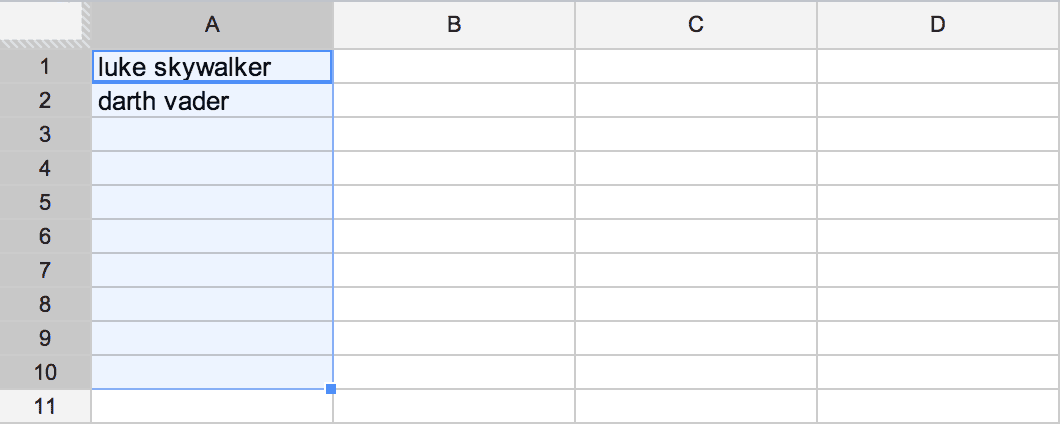
Are you ready for some magic? Google spreadsheets allows you to take two cells and find other related terms. First, fill two cells with related items and highlight them, like so:
A screenshot of a Google spreadsheet that says luke skywalker and darth vader in the first two cells.
Now we need to drag out the set. On a Mac, hold down option. On a PC, hold down Ctrl. While holding down the modifier key, click on the small blue box in the bottom right corner of the highlighted cells, and drag downwards.
sets-02
Google will fill in other related terms. In this case, Google magically filled in the remaining cells with other Star Wars characters. It's not perfect, but it works pretty well for most things. From what I understand, this technology is what's left of Google Sets, a defunct Google Labs project.
sets-03
It's hard for me to say exactly how you can use this one, but it's definitely a fun curiosity that's helped me brainstorm related ideas in sort of a fuzzy mind-mapping fashion. I'm hoping to see some clever ideas in the comments!


Source: http://blog.teamtreehouse.com/8-google-docs-tips-you-may-not-have-known-about

8 Google Docs Tips You May Not Have Known About

blogAccessibility
Like many web professionals, I use Google Docs every day to create and share information. It's a fantastic suite of tools that's perfect for collaborating with your coworkers and interacting with clients. In fact, I think mastering Google Docs has become an essential professional skill.
At Treehouse, we use Google Docs documents and spreadsheets for everything from writing video scripts to analyzing data and statistics. I'm always looking for new tips and exploring the menus, because in a tool that I use every day, small efficiencies can add up to big time savings. In this post, I'll share a few uncommon Google Docs tips I've learned over the last few years that will make you into a document-wrangling, cowboy-ninja, spreadsheet-wizard… person.

1. Show all keyboard shortcuts.

Using the mouse to click on things may feel easy, but it's slow. Keyboard shortcuts are one of the fastest ways to get better at any piece of software (especially StarCraft). Whether you're viewing a spreadsheet, a doc, or you're in the list of documents, you can bring up a full list of shortcut keys. Just use the following (you guessed it) keyboard shortcut:
  • On Mac, press ⌘ + /
  • On Windows, press Ctrl + /
When you hit these keys, you should get a contex tual overlay that gives you the hotkeys for the current view; they're different for each app. It looks something like this:

2. Use Gmail shortcuts in the list view.

If you've mastered the shortcuts in either Gmail or the Google Docs list view, then you've actually mastered both. When you're traversing lots of documents, it's often helpful to make some bulk edits or star some documents to find them quickly later.
Here are the most important keys for navigating the list view:
  • J  Navigate to the next item in the list
  • K  Navigate to the previous item in the list
  • X  Select/unselect an item
  • S  Star/unstar an item

3. Free yourself from distraction and edit fullscreen.

If you need to stay hyper-focused on a document in a distraction free environment, this is for you. In a document, go to the View menu and select the Full screen option.
A screenshot of the View menu in Google docs
The controls will disappear so that you can focus on your content. I recommend setting your browser to full screen for maximum effect. To get out of fullscreen mode, simply press the Esc key.

4. Hack the custom header styles to quickly add formatting.

When you're editing a Google document, it's helpful to create headings so that each section of your writing is clearly defined. The default headings are good for most purposes, but if you frequently need to apply special formatting, you can make your own "headings" and apply them to any inline text. For example, I use the special headings to highlight parts of Treehouse video scripts that include motion graphics, special camera moves, blocking, and computer code.
A screenshot of the Title menu in Google Docs.
To create a new header style, simply format your text how you'd like and highlight it. Then go to the Title menu, click one of the right facing arrows next to a header, and select Update 'heading X' to match with X being the header number.
Then, when you need to apply the same formatting, you can simply set the text to o ne of the title styles in the menu as you would normally.
Note: This will only apply to one document at a time, so don't worry about 'messing up' the default styles for other documents or other people in your organization.

5. Get started with a template.

Google maintains a directory of templates that you can use to get a jump start on your next document. There's a pretty huge selection and it's easy to filter and sort. Whether you're setting up a personal finance spreadsheet or writing a resume and cover letter, there's probably a template in there that can seriously cut down on your setup time.

6. Automagically create a table of contents.

When I create outlines for new courses on Treehouse, the documents tend to get pretty lengthy. Fortunate ly, if you structure your document using the various header levels in the Title menu, Google Docs can automatically generate a table of contents for you. This TOC allows you to jump to any part of the document, making navigation quick and easy for long documents.
In a document with several headings, place your insertion point at the top of the document. Then, go to the Insert menu and click Table of contents to add a TOC. Here's a picture of the finished result:
Screenshot of a Google Docs table of contents.
Note: This probably won't work properly if you use the header hack in tip 4 to format inline text. I only use TOCs for creating outlines and not scripting videos.

7. Use conditional formatting to color spreadsheets.

Maybe y ou're not surprised that spreadsheets in Google Docs are capable of coloring cells based on conditional formatting. Yet for some reason, very few people know about this feature when I tell them. If you're working with numerical data or dates, coloring cells can help you quickly distill and comprehend large datasets.
I created an example data set that represents a traditional classroom with test scores (and in the process, I also learned about the random number generators in the function list). Let's say you're a teacher, and you want to visually identify students that scored 75 or below on a test. To do this, hover over the column header and click the arrow icon that appears to bring up a menu. Then click the Conditional formatting… option towards the bottom.
Note: In the image below, there are numbers in column B that are covered by the menu.
Screenshot of the conditional formatting menu in Google spreadsheets.
When the conditional formatting modal appears, you can add rules that will color the cells. In the image below, you can see what these rules look like for our example. Any numbers at 75 or below will be highlighted in yellow. Everything else will be green.
Screenshot of the conditional formatting modal in Google spreadsheets.
Here's what the data looks like with the added color. Even better, when we sort Column B, we'll see a visual that depicts the ratio between low scores and high scores. The block of yellow cells will be set against the block of green cells. Conditional formatting is like a grappling hook for climbing the DIKW Pyramid. It's a tool that can help you make the leap from data to useful information.
Screenshot of a Google spreadsheet with conditionally formatted cells.

8. Extrapolate sets of related terms.

Are you ready for some magic? Google spreadsheets allows you to take two cells and find other related terms. First, fill two cells with related items and highlight them, like so:
A screenshot of a Google spreadsheet that says luke skywalker and darth vader in the first two cells.
Now we need to drag out the set. On a Mac, hold down option. On a PC, hold down Ctrl. While holding down the modifier key, click on the small blue box in the bottom right corner of the highlighted cells, and drag downwards.
sets-02
Google will fill in other related terms. In this case, Google magically filled in the remaining cells with other Star Wars characters. It's not perfect, but it works pretty well for most things. From what I understand, this technology is what's left of Google Sets, a defunct Google Labs project.
sets-03
It's hard for me to say exactly how you can use this one, but it's definitely a fun curiosity that's helped me brainstorm related ideas in sort of a fuzzy mind-mapping fashion. I'm hoping to see some clever ideas in the comments!


Source: http://blog.teamtreehouse.com/8-google-docs-tips-you-may-not-have-known-about

Thu_thuat_Android_4_4Kit_kat.

Android 4.4 KitKat đã ra mắt được hơn ba tháng, và giờ thì nhiều anh em cũng bắt đầu được tiếp cận với phiên bản hệ điều hành này thông qua các bản cập nhật chính hãng cũng như ROM cook. Sau một thời gian sử dụng mình có một số thủ thuật muốn chia sẻ với anh em, từ những thứ tinh chỉnh trong hệ thống, app mới cho đến mẹo kích hoạt các tính năng ẩn. Hi vọng nó sẽ giúp các bạn sử dụng thiết bị của mình hiệu quả và ngon lành hơn.

Nội dung bài viết sẽ bao gồm những mục n hư sau, mình vẽ ra để anh em dễ theo dõi

Cau_truc_bai_thu_thuat.

Video

1. Trình chọn file mới hoàn toàn

Đây là một trong những cải tiến tốt nhất của Android 4.4 KitKat bởi nó cho phép chúng ta chọn file rất dễ dàng và truy cập được đến với nhiều khu vực lưu trữ khác nhau. Bạn hãy thử chạy một ứng dụng nào đó cần mở file, ví dụ như khi soạn thư bằng Gmail, chọn nút menu rồi nhấn vào "Attach file". Trong giao diện mở ra (tên gọi chính xác là "File Picker" nhé), chúng ta có thể chọn tập tin của mình từ các ổ Google Drive, duyệt riêng tập tin hình ảnh/video/âm thanh đang lưu trên thiết bị, mở file đã download. Chưa hết, chúng ta còn có một mục "Internal Storage" để bạn thoải mái chọn bất kì tập tin nào đang lưu trong hệ thống. Bạn cũng được phép chọn các ứng dụng tích hợp sẵn hoặc app bên thứ ba để duyệt tập tin nữa.

Trong các bản Android trước đây, nếu muốn dùng một File Picker mạnh mẽ như trên, bạn phải cài thêm app từ bên ngoài, còn bây giờ thì nó đã có sẵn trong máy luôn. Thật là tuyệt vời! Lưu ý rằng nếu bạn không thể duyệt file chứa trong bộ nhớ trong hoặc thẻ SD thì hãy chọn vào nút menu của File Picker, tích vào ô "Display advanced devices" nhé.

Android_File_Picker_1.

2. Kích hoạt lại widget ngoài màn hình khóa

Tính năng gắn widget ra màn hình khóa đã được Google ra mắt từ năm ngoái, tuy nhiên vì những lý do bảo mật mà hãng đã mặc định vô hiệu hóa nên trên Android 4.4. Nhiều bạn có hỏi mình, sẵn đây xin chia sẻ với anh em luôn. Để bật lại tính năng này, các bạn hãy truy cập vào trình Settings > mục Security > ở mục Screen Security hãy chọn vào dòng "Enable widget". Sau đó, bạn quay ra màn hình khòa, trượt ngón tay từ trái sang phải để chọn và gắn widget như trước. Hi vọng thủ thuật nho nhỏ này sẽ giúp bạn sử dụng Android 4.4 KitKat hiệu quả hơn.

3. Kích hoạt chế độ hiển thị % pin bị ẩn

Trong Android 4.4 KitKat, Google có tích hợp một chế độ hiển thị phần trăm pin cho hệ thống. Điểm lợi của tính năng này đó là chúng ta không phải root hay tinh chỉnh các tập tin hệ thống như phương pháp mod hay chỉnh theme trước đây. Có vẻ như việc hiển thị % pin này vẫn chưa hoàn chỉnh nên Google mới phải ẩn nó đi, điển hình là chúng ta phải dùng màu chữ trắng như hình minh họa mình để ở đầu bài và nó hơi tiệp so với màu của viên pin. Nếu muốn, anh em có th ể download tập tin APK bên dưới về, cài vào máy, chạy ứng dụng "Percentage Enabler" lên và tích vào ô "Enable battery percentage" là xong.

Tải về ứng dụng Percentage Enabler

pin_an_trong_Android_4_4.

4. Trượt ngón tay sang cạnh trái màn hình để kích hoạt Google Now

Kể từ hồi Android 4.1 chúng ta đã có Google Now, một công cụ cung cấp thông tin rất thông minh và hữu ích dựa vào ngữ cảnh, địa điểm, thời gian trong ngày. Để kích hoạt nó, với các máy có phím ảo trên màn hình thì các bạn sẽ trượt ngón tay từ phím home lên, hoặc nhấn vào một phím nào đó do nhà sản xuất chỉ định. Lên đến Android 4.4 KitKat, chúng ta có một cách dễ và vui vẻ hơn để chạy Google Now: trượt ngón tay từ trái sang phải khi đang ở màn hình khóa.

Lưu ý:
  • Với các bạn KHÔNG dùng Nexus 5 thì để xài được tính năng này, bạn phải dùng launcher của Google. Cách cài thì dễ thôi, các bạn hãy download ba tập tin PreBuiltGmsCore (Google Play Services 4.0), Velvet (Google Search) và GoogleHome (Google Launcher). Sau đó, cài hết cả ba vào smartphone bạn đang cầm trên tay là xong.
  • Nếu bạn bị lỗi force close khi dùng Google Voice Search thì hãy nhấn giữ vào màn hình chính, chọn Settings > Voice > Select Language. Mặc định là tiếng anh, bạn hãy chuyển qua một thứ tiếng khác, tiếng Việt chẳng hạn, rồi thực hiện tìm kiếm đại một thứ gì đó. Sau đó nếu muốn xài tiếng Anh thì bạn chọn trở lại tiếng Anh là được.
  • Nếu bạn KHÔNG có Google Now, hãy thử đổi ngôn ngữ hệ thống sang tiếng Anh, khởi động máy lại, kế tiếp vào ứng dụng Google (logo màu xanh) > nhấn phím menu > bật Google Now. Khi Now đã chạy lên rồi thì bạn có thể đổi lại tiếng Việt nếu thích.

5. Tạo nhắc nhở bằng Google Now

Đồng ý là chúng ta có khá nhiều app nhắc nhở hay, nhưng Google Now cũng có cung cấp sẵn một công cụ rất tiện lợi đấy nhé. Khi mở Google Now, bạn hãy nhìn xuống góc trái bên dưới màn hình sẽ thấy nút có hình bàn tay. Nhấn vào đây và giao diện Reminder sẽ mở ra, sau đó bạn hãy nhấn dấu + để thêm nhắc nhở mới. Kế tiếp, tiến hành chọn nội dung mà máy sẽ hiện thông báo nhắc bạn, vào mấy giờ, ngày nào, và có lặp lại hay không. Bạn cũng có thể chọn nhắc nhở dựa theo địa điểm, tức là khi bạn đến một vị trí X nào đó thì máy sẽ hiển thị thông báo lên, thực hiện điều này bằng cách nhấn vào nút "Where" hình tròn.

Google_Now_Remider_1.

6. Tận dụng trình gọi điện mới

Dialer mới của Android 4.4 KitKat rất ngon, không thua kém gì so với các app bên thứ ba trên Google Play và cũng có rất nhiều tính năng mới so với các đời Android trước. Chẳng hạn, bạn có tìm kiếm danh bạ rất nhanh nhờ hộp search nằm ở cạnh trên màn hình, hỗ trợ tìm kiếm bằng giọng nói, sử dụng bàn phím số T9 để gợi ý tên. Ngoài ra ứng dụng này còn được Google trang bị thêm tính năng mới mà họ gọi là "ID người gọi". Nghĩa là nếu như số điện thoại gọi đến không được định danh trong danh bạ thì Google sẽ cung cấp cho bạn thông tin về số điện thoại đó. Bạn có thể xem thêm bài viết của anh @vuhai6 để biết thêm chi tiết về Dialer mới này nhé.

7. Bỏ qua báo thức khi ngủ dậy sớm

Chắc hẳn cũng có đôi lần bạn thức dậy trước khi báo thức kêu. Và thường là do quên hoặc vì bận bịu gì đó mà chúng ta không tắt báo thức trên điện thoại đi, thế là nó cứ kêu lên rất phiền phức. Để giải quyết chuyện này, Android 4.4 KitKat sẽ hiển thị thông báo về báo thức trước 1 tiếng so với giờ mà bạn cài đặt ở mục "Upcoming Alarm". Nếu bạn dậy sớm, bạn có thể nhấn vào nút "Dismiss Now" trong khu vực notification và báo thức sẽ được tắt luôn, không cần chúng ta phải chạy app đồng hồ lên nữa.

Alarm_dismiss.

8. Chọn launcher và trình SMS mặc định

Trước đây khi cài thêm các launcher bên thứ ba vào, chúng ta không sẵn có tùy chọn đơn giản nào để chuyển giữa các launcher với nhau một cách nhanh chóng. Lên tới Android 4.4 KitKat thì Google có bổ sung thêm một mục "Home" trong trình cài đặt hệ thống (Settings), hãy vào đó và bạn có thể thoái mái chọn các launcher theo ý mình, không phải cài thêm bất kì app quản lý nào nữa.

Ngoài ra, có lẽ bạn cũng biết là Android 4.4 KitKat sẽ yêu cầu chúng ta chọn một ứng dụng để nhắn tin SMS mặc đ ịnh. Với các bạn xài Nexus thì mặc định sẽ là app Hangouts, một số máy khác thì có trình SMS riêng của nhà sản xuất, hoặc bạn cũng có thể cài thêm app bên thứ ba vào. Trong trường hợp bạn cần chuyển trình SMS mặc định sang một ứng dụng khác, hãy vào Settings > More > Default SMS app.

SMS_mac_dinh.

9. Quản lý dung lượng RAM tiêu thụ bằng công cụ có sẵn

"Process Stats" (ProcsStats) nằm trong phần cấu hình dành cho lập trình viên trên Android 4.4 KitKat. Khi truy cập vào Settings > Developer options > Process Stats, chúng ta sẽ có khả năng theo dõi những ứng dụng và dịch vụ nào đang hoạt động, tần suất chạy của chúng là bao lâu, dung lượng RAM cao nhất và dung lượng RAM trung bình mà chúng sử dụng là bao nhiêu. Khi thấy một app nào đó chiếm nhiều RAM quá, bạn có thể tắt nó một cách thủ công bằng cách chọn vào app cần đóng, nhấn nút "Force stop".

Bạn cũng có thể chọn vào nút menu > Stats type để xem thống kê về mức RAM tiêu thụ của các phần mềm chạy ngầm (background), chạy "nổi" (foreground) hoặc chạy dưới dạng tiến trình trong bộ nhớ đệm (cache).

Ghi chú: Nếu chưa thấy Developer Options, bạn vào Settings > About phone/tablet > chạm vào dòng Build Number từ 5 đến 7 lần liên tục.

ProcSta   ts_1.

10. Thử xài ART, bộ nhân giải mã mới

Trong Android 4.4 KitKat, Google đã ra mắt một giải pháp thay thế cho anh chàng nhân giải mã Dalvik già cỗi, đó chính là Android Runtime (ART). Lợi ích lớn nhất của ART đó là nó cho phép lập trình viên Android tiếp tục viết phần mềm theo như cách mà họ đã làm từ trước đến nay, phần mềm của họ cũng vẫn có thể chạy trên nhiều loại CPU và thiết bị khác nhau, nhưng với tốc độ nhanh hơn đáng kể. Cảm giác máy sẽ mượt mà hơn. Một phiên bản thử nghiệm của ART đã được nhúng trong Android 4.4 và bạn có thể tìm thấy nó ở trong phần Settings > Developer Options > Select Runtime.

Lưu ý: Một số máy dùng ROM cook có t hể không có ART, và việc kích hoạt nó lên có thể khiến hệ thống và ứng dụng gặp lỗi nghiêm trọng vì chỉ mới ở giai đoạn thử nghiệm. Anh em nên đọc thêm bài Tìm hiểu về Android Runtime trước khi thử kích hoạt ART lên.

Rồi, đó là những gì mình thu thập được trong thời gian qua. Giờ thì tới lượt anh em, nếu có thủ thuật gì hay liên quan đến Android 4.4 KitKat thì hãy chia sẻ ngay trong topic này luôn nhé. Xin cảm ơn và chúc các bạn vui vẻ!

Source: http://www.tinhte.vn/threads/tong-hop-mot-so-thu-thuat-huu-ich-cho-android-4-4-kitkat.2232414/

Tổng hợp một số thủ thuật hữu ích cho Android 4.4 KitKat

Thu_thuat_Android_4_4Kit_kat.

Android 4.4 KitKat đã ra mắt được hơn ba tháng, và giờ thì nhiều anh em cũng bắt đầu được tiếp cận với phiên bản hệ điều hành này thông qua các bản cập nhật chính hãng cũng như ROM cook. Sau một thời gian sử dụng mình có một số thủ thuật muốn chia sẻ với anh em, từ những thứ tinh chỉnh trong hệ thống, app mới cho đến mẹo kích hoạt các tính năng ẩn. Hi vọng nó sẽ giúp các bạn sử dụng thiết bị của mình hiệu quả và ngon lành hơn.

Nội dung bài viết sẽ bao gồm những mục n hư sau, mình vẽ ra để anh em dễ theo dõi

Cau_truc_bai_thu_thuat.

Video

1. Trình chọn file mới hoàn toàn

Đây là một trong những cải tiến tốt nhất của Android 4.4 KitKat bởi nó cho phép chúng ta chọn file rất dễ dàng và truy cập được đến với nhiều khu vực lưu trữ khác nhau. Bạn hãy thử chạy một ứng dụng nào đó cần mở file, ví dụ như khi soạn thư bằng Gmail, chọn nút menu rồi nhấn vào "Attach file". Trong giao diện mở ra (tên gọi chính xác là "File Picker" nhé), chúng ta có thể chọn tập tin của mình từ các ổ Google Drive, duyệt riêng tập tin hình ảnh/video/âm thanh đang lưu trên thiết bị, mở file đã download. Chưa hết, chúng ta còn có một mục "Internal Storage" để bạn thoải mái chọn bất kì tập tin nào đang lưu trong hệ thống. Bạn cũng được phép chọn các ứng dụng tích hợp sẵn hoặc app bên thứ ba để duyệt tập tin nữa.

Trong các bản Android trước đây, nếu muốn dùng một File Picker mạnh mẽ như trên, bạn phải cài thêm app từ bên ngoài, còn bây giờ thì nó đã có sẵn trong máy luôn. Thật là tuyệt vời! Lưu ý rằng nếu bạn không thể duyệt file chứa trong bộ nhớ trong hoặc thẻ SD thì hãy chọn vào nút menu của File Picker, tích vào ô "Display advanced devices" nhé.

Android_File_Picker_1.

2. Kích hoạt lại widget ngoài màn hình khóa

Tính năng gắn widget ra màn hình khóa đã được Google ra mắt từ năm ngoái, tuy nhiên vì những lý do bảo mật mà hãng đã mặc định vô hiệu hóa nên trên Android 4.4. Nhiều bạn có hỏi mình, sẵn đây xin chia sẻ với anh em luôn. Để bật lại tính năng này, các bạn hãy truy cập vào trình Settings > mục Security > ở mục Screen Security hãy chọn vào dòng "Enable widget". Sau đó, bạn quay ra màn hình khòa, trượt ngón tay từ trái sang phải để chọn và gắn widget như trước. Hi vọng thủ thuật nho nhỏ này sẽ giúp bạn sử dụng Android 4.4 KitKat hiệu quả hơn.

3. Kích hoạt chế độ hiển thị % pin bị ẩn

Trong Android 4.4 KitKat, Google có tích hợp một chế độ hiển thị phần trăm pin cho hệ thống. Điểm lợi của tính năng này đó là chúng ta không phải root hay tinh chỉnh các tập tin hệ thống như phương pháp mod hay chỉnh theme trước đây. Có vẻ như việc hiển thị % pin này vẫn chưa hoàn chỉnh nên Google mới phải ẩn nó đi, điển hình là chúng ta phải dùng màu chữ trắng như hình minh họa mình để ở đầu bài và nó hơi tiệp so với màu của viên pin. Nếu muốn, anh em có th ể download tập tin APK bên dưới về, cài vào máy, chạy ứng dụng "Percentage Enabler" lên và tích vào ô "Enable battery percentage" là xong.

Tải về ứng dụng Percentage Enabler

pin_an_trong_Android_4_4.

4. Trượt ngón tay sang cạnh trái màn hình để kích hoạt Google Now

Kể từ hồi Android 4.1 chúng ta đã có Google Now, một công cụ cung cấp thông tin rất thông minh và hữu ích dựa vào ngữ cảnh, địa điểm, thời gian trong ngày. Để kích hoạt nó, với các máy có phím ảo trên màn hình thì các bạn sẽ trượt ngón tay từ phím home lên, hoặc nhấn vào một phím nào đó do nhà sản xuất chỉ định. Lên đến Android 4.4 KitKat, chúng ta có một cách dễ và vui vẻ hơn để chạy Google Now: trượt ngón tay từ trái sang phải khi đang ở màn hình khóa.

Lưu ý:
  • Với các bạn KHÔNG dùng Nexus 5 thì để xài được tính năng này, bạn phải dùng launcher của Google. Cách cài thì dễ thôi, các bạn hãy download ba tập tin PreBuiltGmsCore (Google Play Services 4.0), Velvet (Google Search) và GoogleHome (Google Launcher). Sau đó, cài hết cả ba vào smartphone bạn đang cầm trên tay là xong.
  • Nếu bạn bị lỗi force close khi dùng Google Voice Search thì hãy nhấn giữ vào màn hình chính, chọn Settings > Voice > Select Language. Mặc định là tiếng anh, bạn hãy chuyển qua một thứ tiếng khác, tiếng Việt chẳng hạn, rồi thực hiện tìm kiếm đại một thứ gì đó. Sau đó nếu muốn xài tiếng Anh thì bạn chọn trở lại tiếng Anh là được.
  • Nếu bạn KHÔNG có Google Now, hãy thử đổi ngôn ngữ hệ thống sang tiếng Anh, khởi động máy lại, kế tiếp vào ứng dụng Google (logo màu xanh) > nhấn phím menu > bật Google Now. Khi Now đã chạy lên rồi thì bạn có thể đổi lại tiếng Việt nếu thích.

5. Tạo nhắc nhở bằng Google Now

Đồng ý là chúng ta có khá nhiều app nhắc nhở hay, nhưng Google Now cũng có cung cấp sẵn một công cụ rất tiện lợi đấy nhé. Khi mở Google Now, bạn hãy nhìn xuống góc trái bên dưới màn hình sẽ thấy nút có hình bàn tay. Nhấn vào đây và giao diện Reminder sẽ mở ra, sau đó bạn hãy nhấn dấu + để thêm nhắc nhở mới. Kế tiếp, tiến hành chọn nội dung mà máy sẽ hiện thông báo nhắc bạn, vào mấy giờ, ngày nào, và có lặp lại hay không. Bạn cũng có thể chọn nhắc nhở dựa theo địa điểm, tức là khi bạn đến một vị trí X nào đó thì máy sẽ hiển thị thông báo lên, thực hiện điều này bằng cách nhấn vào nút "Where" hình tròn.

Google_Now_Remider_1.

6. Tận dụng trình gọi điện mới

Dialer mới của Android 4.4 KitKat rất ngon, không thua kém gì so với các app bên thứ ba trên Google Play và cũng có rất nhiều tính năng mới so với các đời Android trước. Chẳng hạn, bạn có tìm kiếm danh bạ rất nhanh nhờ hộp search nằm ở cạnh trên màn hình, hỗ trợ tìm kiếm bằng giọng nói, sử dụng bàn phím số T9 để gợi ý tên. Ngoài ra ứng dụng này còn được Google trang bị thêm tính năng mới mà họ gọi là "ID người gọi". Nghĩa là nếu như số điện thoại gọi đến không được định danh trong danh bạ thì Google sẽ cung cấp cho bạn thông tin về số điện thoại đó. Bạn có thể xem thêm bài viết của anh @vuhai6 để biết thêm chi tiết về Dialer mới này nhé.

7. Bỏ qua báo thức khi ngủ dậy sớm

Chắc hẳn cũng có đôi lần bạn thức dậy trước khi báo thức kêu. Và thường là do quên hoặc vì bận bịu gì đó mà chúng ta không tắt báo thức trên điện thoại đi, thế là nó cứ kêu lên rất phiền phức. Để giải quyết chuyện này, Android 4.4 KitKat sẽ hiển thị thông báo về báo thức trước 1 tiếng so với giờ mà bạn cài đặt ở mục "Upcoming Alarm". Nếu bạn dậy sớm, bạn có thể nhấn vào nút "Dismiss Now" trong khu vực notification và báo thức sẽ được tắt luôn, không cần chúng ta phải chạy app đồng hồ lên nữa.

Alarm_dismiss.

8. Chọn launcher và trình SMS mặc định

Trước đây khi cài thêm các launcher bên thứ ba vào, chúng ta không sẵn có tùy chọn đơn giản nào để chuyển giữa các launcher với nhau một cách nhanh chóng. Lên tới Android 4.4 KitKat thì Google có bổ sung thêm một mục "Home" trong trình cài đặt hệ thống (Settings), hãy vào đó và bạn có thể thoái mái chọn các launcher theo ý mình, không phải cài thêm bất kì app quản lý nào nữa.

Ngoài ra, có lẽ bạn cũng biết là Android 4.4 KitKat sẽ yêu cầu chúng ta chọn một ứng dụng để nhắn tin SMS mặc đ ịnh. Với các bạn xài Nexus thì mặc định sẽ là app Hangouts, một số máy khác thì có trình SMS riêng của nhà sản xuất, hoặc bạn cũng có thể cài thêm app bên thứ ba vào. Trong trường hợp bạn cần chuyển trình SMS mặc định sang một ứng dụng khác, hãy vào Settings > More > Default SMS app.

SMS_mac_dinh.

9. Quản lý dung lượng RAM tiêu thụ bằng công cụ có sẵn

"Process Stats" (ProcsStats) nằm trong phần cấu hình dành cho lập trình viên trên Android 4.4 KitKat. Khi truy cập vào Settings > Developer options > Process Stats, chúng ta sẽ có khả năng theo dõi những ứng dụng và dịch vụ nào đang hoạt động, tần suất chạy của chúng là bao lâu, dung lượng RAM cao nhất và dung lượng RAM trung bình mà chúng sử dụng là bao nhiêu. Khi thấy một app nào đó chiếm nhiều RAM quá, bạn có thể tắt nó một cách thủ công bằng cách chọn vào app cần đóng, nhấn nút "Force stop".

Bạn cũng có thể chọn vào nút menu > Stats type để xem thống kê về mức RAM tiêu thụ của các phần mềm chạy ngầm (background), chạy "nổi" (foreground) hoặc chạy dưới dạng tiến trình trong bộ nhớ đệm (cache).

Ghi chú: Nếu chưa thấy Developer Options, bạn vào Settings > About phone/tablet > chạm vào dòng Build Number từ 5 đến 7 lần liên tục.

ProcSta   ts_1.

10. Thử xài ART, bộ nhân giải mã mới

Trong Android 4.4 KitKat, Google đã ra mắt một giải pháp thay thế cho anh chàng nhân giải mã Dalvik già cỗi, đó chính là Android Runtime (ART). Lợi ích lớn nhất của ART đó là nó cho phép lập trình viên Android tiếp tục viết phần mềm theo như cách mà họ đã làm từ trước đến nay, phần mềm của họ cũng vẫn có thể chạy trên nhiều loại CPU và thiết bị khác nhau, nhưng với tốc độ nhanh hơn đáng kể. Cảm giác máy sẽ mượt mà hơn. Một phiên bản thử nghiệm của ART đã được nhúng trong Android 4.4 và bạn có thể tìm thấy nó ở trong phần Settings > Developer Options > Select Runtime.

Lưu ý: Một số máy dùng ROM cook có t hể không có ART, và việc kích hoạt nó lên có thể khiến hệ thống và ứng dụng gặp lỗi nghiêm trọng vì chỉ mới ở giai đoạn thử nghiệm. Anh em nên đọc thêm bài Tìm hiểu về Android Runtime trước khi thử kích hoạt ART lên.

Rồi, đó là những gì mình thu thập được trong thời gian qua. Giờ thì tới lượt anh em, nếu có thủ thuật gì hay liên quan đến Android 4.4 KitKat thì hãy chia sẻ ngay trong topic này luôn nhé. Xin cảm ơn và chúc các bạn vui vẻ!

Source: http://www.tinhte.vn/threads/tong-hop-mot-so-thu-thuat-huu-ich-cho-android-4-4-kitkat.2232414/


You can use the Omnibox of your Chrome browser to google things or sift through your search history but did you know you can create a Google Calendar event straight from the Omnibox as well?
Omnibox Add Calendar Event
In this quicktip, we'll show you how you can create new Google Calendar events on the Omnibox with a simple setup.

Add New Search Engine In Omnibox

First, open up Chrome, click the Navicon, and choose Settings. Alternatively, you can use Cmd + + + , to trigger it immediately.
Look for "Manage search engines… " under Search and click it.
Manage Search Engine
Scroll down until you reach the bottom and you will see 3 empty text boxes in a single row.
Search Engines
1. Fill the first text box to the left "Add a new search engine box" with Add Calendar Event.
2. Type incal in the "Keyword" text box.
3. Copy and paste this link inside the last text box:
http://www.google.com/calendar/event?ctext=+%s+&action=TEMPLATE&pprop=HowCreated%3AQUICKADD
4. Click Done.
Add Search Engine

Add Event From Chrome Omnibox

Now you can add events to your Google Calendar straight from the Omnibox. Just type cal, press Tab, and add your calendar event. You can even put in the day and time of the event, for example, "Ann's Birthday at Green Cafe on Sunday 4pm".
Omnibox Add Calendar Event
When you press Enter, you will then be redirected to Google Calendar with the details already automatically filled. Make your changes (if any), then save the event.
Save Or Discard Event


Source: http://www.hongki at.com/blog/add-google-calendar-event-using-omnibox/

[Hongkiat] How To Add Google Calendar Events From Chrome Omnibox


You can use the Omnibox of your Chrome browser to google things or sift through your search history but did you know you can create a Google Calendar event straight from the Omnibox as well?
Omnibox Add Calendar Event
In this quicktip, we'll show you how you can create new Google Calendar events on the Omnibox with a simple setup.

Add New Search Engine In Omnibox

First, open up Chrome, click the Navicon, and choose Settings. Alternatively, you can use Cmd + + + , to trigger it immediately.
Look for "Manage search engines… " under Search and click it.
Manage Search Engine
Scroll down until you reach the bottom and you will see 3 empty text boxes in a single row.
Search Engines
1. Fill the first text box to the left "Add a new search engine box" with Add Calendar Event.
2. Type incal in the "Keyword" text box.
3. Copy and paste this link inside the last text box:
http://www.google.com/calendar/event?ctext=+%s+&action=TEMPLATE&pprop=HowCreated%3AQUICKADD
4. Click Done.
Add Search Engine

Add Event From Chrome Omnibox

Now you can add events to your Google Calendar straight from the Omnibox. Just type cal, press Tab, and add your calendar event. You can even put in the day and time of the event, for example, "Ann's Birthday at Green Cafe on Sunday 4pm".
Omnibox Add Calendar Event
When you press Enter, you will then be redirected to Google Calendar with the details already automatically filled. Make your changes (if any), then save the event.
Save Or Discard Event


Source: http://www.hongki at.com/blog/add-google-calendar-event-using-omnibox/


Source: http://mashable.com/2013/12/16/google-maps-tricks/

5 Valuable Google Maps Tips and Tricks


Source: http://mashable.com/2013/12/16/google-maps-tricks/

For general queries like [global warming], [love], [Mandela], [China], Google shows some in-depth news articles at the bottom of the first page of results. Until now, Google only included 3 articles, but this has changed: you can click "more in-depth articles" and get 5 more articles.


Google also added some related queries you can explore to find other related articles. Clicking the "explore" links sends you to a page that places in-depth articles at the top, but also shows regular search results. Google adds &ida_m=1 to the search URL.


{ Thanks, Rubén. }

Source: http://googlesystem.blogspot.com/2013/12/more-in-depth-articles-in-google-search.html

More In-Depth Articles in Google Search

For general queries like [global warming], [love], [Mandela], [China], Google shows some in-depth news articles at the bottom of the first page of results. Until now, Google only included 3 articles, but this has changed: you can click "more in-depth articles" and get 5 more articles.


Google also added some related queries you can explore to find other related articles. Clicking the "explore" links sends you to a page that places in-depth articles at the top, but also shows regular search results. Google adds &ida_m=1 to the search URL.


{ Thanks, Rubén. }

Source: http://googlesystem.blogspot.com/2013/12/more-in-depth-articles-in-google-search.html

These features aren't new, but they're pretty useful and they might help you become more productive when you download files in Google Chrome.

1. Do you want to open a file immediately after Chrome downloads it? You don't have to wait, just click the file in the download bar and you should see something like "opening in X minutes".


2. If you always want to open certain files after Chrome downloads them, click the arrow icon and check "always open files of this type". You can use this for .mp4 files or .torrent files, for example.


3. How to move to the desktop a file you've just downloaded? Just drag it from the download bar and drop it onto your desktop.

4. Some files open directly in Chrome: PDF documents, MP4 videos, MP3 songs. How to download them? Use a keyboard shortcut: Ctrl+S or Command-S for Mac. Another option is to right click and select "save as". You can also right click the link to the file and select "save link as".

5. Don't worry about closing the Chrome window accidentally while downloading some files. Chrome shows a warning: "download in progress".


6. Manage your downloads by clicking "Downloads" in the Chrome or pressing Ctrl+J (Command-J for Mac). Use the search box to find a file you've downloaded last month, right-click the URL and you can copy it, click "Show in folder" to locate the file. You can also clear all the downloads.


Source: http://googlesystem.blogspot.com/2013/12/chrome-download-tips.html

Chrome Download Tips

These features aren't new, but they're pretty useful and they might help you become more productive when you download files in Google Chrome.

1. Do you want to open a file immediately after Chrome downloads it? You don't have to wait, just click the file in the download bar and you should see something like "opening in X minutes".


2. If you always want to open certain files after Chrome downloads them, click the arrow icon and check "always open files of this type". You can use this for .mp4 files or .torrent files, for example.


3. How to move to the desktop a file you've just downloaded? Just drag it from the download bar and drop it onto your desktop.

4. Some files open directly in Chrome: PDF documents, MP4 videos, MP3 songs. How to download them? Use a keyboard shortcut: Ctrl+S or Command-S for Mac. Another option is to right click and select "save as". You can also right click the link to the file and select "save link as".

5. Don't worry about closing the Chrome window accidentally while downloading some files. Chrome shows a warning: "download in progress".


6. Manage your downloads by clicking "Downloads" in the Chrome or pressing Ctrl+J (Command-J for Mac). Use the search box to find a file you've downloaded last month, right-click the URL and you can copy it, click "Show in folder" to locate the file. You can also clear all the downloads.


Source: http://googlesystem.blogspot.com/2013/12/chrome-download-tips.html

Đây có lẽ là tính năng ẩn ít được biết đến của GMail.
Khi bạn thêm dấu + vào địa chỉ email của mình, thì cơ chế của GMail sẽ bỏ qua mọi kí tự từ dấu + đến @gmail.com. Do đó, về lý thuyết, bạn có thể tạo không giới hạn các địa chỉ email dưới dạngEmailCuaBan+CaiGiCungDuoc@gmail.com.
Và khi kết hợp với GMail Filter thì tính năng này tỏ ra cực kì hữu ích:

1. Bạn muốn phân loại email gửi đến từ các trang deal:

Bạn thường xuyên ghé các trang web mua hàng theo nhóm, và đăng ký email để làm thành viên. Tuy nhiên, do có quá nhiều trang web như thế nên việc tạo filter cho từng trang là một gánh nặng thật sự!
Giải pháp của chúng ta là sẽ đăng ký email ở các trang deal 1 email dạng EmailCuaBan+deal@gmail.com và tạo thêm filter như sau:
Gmail filter for Deal sites
Giờ đây bạn có thể gom nhóm email của mọi trang deal một cách nhanh chóng và không cần phải cập nhật filter thường xuyên cho các trang mới.

2. Chống spam

Một số trang web thường đòi hỏi đăng ký, hay cung cấp địa chỉ email của bạn trước khi cho phép bạn sử dụng, hay tải về gì đó. Việc này có thể gây phiền hà, và nhất là email của bạn có thể bị sử dụng trái phép cho mục đích spam.
Giải pháp cho các địa chỉ email dùng 1 lần này là, đăng ký email của bạn có dạngEmailCuaBan+spam@gmail.com và tạo filter để xử lý mạnh tay với các spam email sau này:

3. Đăng ký nhiều tài khoản sử dụng với chỉ 1 địa chỉ email gốc

Đôi khi, bạn có thể sẽ muốn đăng ký nhiều tài khoản người dùng, nhưng lại sợ việc phiền nhiễu khi phải quản lý quá nhiều hộp thư. Một giải pháp thường thấy là cài đặt chuyển tiếp tự động (auto forwarding) mọi email từ các hộp thư phụ đến hộp thư chính. Tuy nhiên, với dấu + quyền lực, bạn không cần phải cài đặt thêm gì cả:

Tuy nhiên, trong một số trường hợp, khung điền địa chỉ email của một số trang web không chấp nhận dấu + và sẽ báo lỗi email không hợp lệ. Lúc đó, bạn có thể sử dụng cách sau để thay thế:

Bonus: Dấu .

GMail cho phép thêm dấu "." ở các vị trí tùy ý trong địa chỉ email của bạn. Do đó, về bản chất thì tất cả các email sau đều là một: EmailCuaBan@gmail.comEmail.Cua.Ban@gmail.com,E.m.a.i.l.C.u.a.B.a.n@gmail.com.
The dots don't matter - Credits to Mocoloco
The dots don't matter – Credits to Mocoloco

Authored by Karmi Phúc.

Dấu + quyền lực trong GMail

Đây có lẽ là tính năng ẩn ít được biết đến của GMail.
Khi bạn thêm dấu + vào địa chỉ email của mình, thì cơ chế của GMail sẽ bỏ qua mọi kí tự từ dấu + đến @gmail.com. Do đó, về lý thuyết, bạn có thể tạo không giới hạn các địa chỉ email dưới dạngEmailCuaBan+CaiGiCungDuoc@gmail.com.
Và khi kết hợp với GMail Filter thì tính năng này tỏ ra cực kì hữu ích:

1. Bạn muốn phân loại email gửi đến từ các trang deal:

Bạn thường xuyên ghé các trang web mua hàng theo nhóm, và đăng ký email để làm thành viên. Tuy nhiên, do có quá nhiều trang web như thế nên việc tạo filter cho từng trang là một gánh nặng thật sự!
Giải pháp của chúng ta là sẽ đăng ký email ở các trang deal 1 email dạng EmailCuaBan+deal@gmail.com và tạo thêm filter như sau:
Gmail filter for Deal sites
Giờ đây bạn có thể gom nhóm email của mọi trang deal một cách nhanh chóng và không cần phải cập nhật filter thường xuyên cho các trang mới.

2. Chống spam

Một số trang web thường đòi hỏi đăng ký, hay cung cấp địa chỉ email của bạn trước khi cho phép bạn sử dụng, hay tải về gì đó. Việc này có thể gây phiền hà, và nhất là email của bạn có thể bị sử dụng trái phép cho mục đích spam.
Giải pháp cho các địa chỉ email dùng 1 lần này là, đăng ký email của bạn có dạngEmailCuaBan+spam@gmail.com và tạo filter để xử lý mạnh tay với các spam email sau này:

3. Đăng ký nhiều tài khoản sử dụng với chỉ 1 địa chỉ email gốc

Đôi khi, bạn có thể sẽ muốn đăng ký nhiều tài khoản người dùng, nhưng lại sợ việc phiền nhiễu khi phải quản lý quá nhiều hộp thư. Một giải pháp thường thấy là cài đặt chuyển tiếp tự động (auto forwarding) mọi email từ các hộp thư phụ đến hộp thư chính. Tuy nhiên, với dấu + quyền lực, bạn không cần phải cài đặt thêm gì cả:

Tuy nhiên, trong một số trường hợp, khung điền địa chỉ email của một số trang web không chấp nhận dấu + và sẽ báo lỗi email không hợp lệ. Lúc đó, bạn có thể sử dụng cách sau để thay thế:

Bonus: Dấu .

GMail cho phép thêm dấu "." ở các vị trí tùy ý trong địa chỉ email của bạn. Do đó, về bản chất thì tất cả các email sau đều là một: EmailCuaBan@gmail.comEmail.Cua.Ban@gmail.com,E.m.a.i.l.C.u.a.B.a.n@gmail.com.
The dots don't matter - Credits to Mocoloco
The dots don't matter – Credits to Mocoloco

Authored by Karmi Phúc.

Source panel - Chrome Dev Tools

1. Control the flow with Breakpoints

breakpoint is an intentional stopping or pausing place in a script, which was put in place for debugging purposes. When a breakpoint is reached, you can "step-through" the code line-by-line and see if things follow the right logic. This view also allows you to inspect the values of any variables to ensure they are what you expect them to be. A very frequent error is you try to use a variable, but it is undefined in the current flow. And thank to breakpoints, it is easy to trace back and see where the bug is.
There're 2 ways to set a breakpoint: manually clicking on the line-number in the Source tab of Chrome Dev Tools, or programmatically using the debugger; in your scripts.
After that, you can control the execution flow with these buttons:
 Continue: continues code execution until we encounter another breakpoint.
 Step over: step through code line-by-line to get insights into how each line affects the variables being updated. Should your code call another function, the debugger won't jump into its code, instead stepping over so that the focus remains on the current function.
 Step into: like Step over, however clicking Step into at the function call will cause the debugger to move its execution to the first line in the functions definition.
Step out: having stepped into a function, clicking this will cause the remainder of the function definition to be run and the debugger will move its execution to the parent function.
Toggle breakpoints: toggles breakpoints on/off while leaving their enabled states intact.
Pro tips:
1. Make sure you understand your codes and logic before using breakpoints.
2. 
Too many breakpoints is a very bad idea!
3. 
A detailed guide to use the breakpoints will be available in another post.

2. Master the console API

The Console API is a collection of methods, which was defined by Chrome Dev Tools. It can be accessed via the global console object, to log all kinds of information you need: a property value, an entire object, or even a DOM element. These information are displayed in the Console tab of Chrome Dev Tools.
While there're a lot of useful methods in the Console API, the below methods are definitely the most popular:

console.log

This method takes one or more expressions as parameters and writes their current values to the console.
Console.Log

console.dir

console.dir() displays all the properties of an object. You can also log an element's JavaScript representation.
Console.Dir

console.table

Display formatted information of arrays and objects as tables. Columns can be sorted, too.
Console.Table()

console.time

Using together with console.timeEnd() to start and stop a timer (identified by a string label). Time is logged in millisecond.
Console.Time

console.trace

Output a stack trace from the point where the method was called, including links to the specific lines in the script source. A blue counter on the left indicates the number of times that method was invoked at that point.
Console.Trace

3. De-minify or prettify your codes

Minified Javascript is intentionally made for machines, not for humans. But, sometimes, you have to dig in the minified codes to track down bugs. If you are reading in the Source tab of Chrome Dev Tools, a pretty printing option is available to make your life easier. Just click on the curly brace  ("Pretty Print") icon in the bottom left corner, the JavaScript is transformed into a more human readable form. This is more easy for debugging and setting breakpoints as well.
Before Pretty Print
After Pretty Print

4. Live edit scripts while running (locally)

Dev Tools allows you to edit script files and run them locally. Just clicking the file you want in the Resources tab, making modifications and Save/Save as with Ctrl+S.

Authored by Karmi Phúc. Reference: https://developers.google.com/chrome-developer-tools/

4 Tricks to debug Javascript with Google Chrome like a Pro

Source panel - Chrome Dev Tools

1. Control the flow with Breakpoints

breakpoint is an intentional stopping or pausing place in a script, which was put in place for debugging purposes. When a breakpoint is reached, you can "step-through" the code line-by-line and see if things follow the right logic. This view also allows you to inspect the values of any variables to ensure they are what you expect them to be. A very frequent error is you try to use a variable, but it is undefined in the current flow. And thank to breakpoints, it is easy to trace back and see where the bug is.
There're 2 ways to set a breakpoint: manually clicking on the line-number in the Source tab of Chrome Dev Tools, or programmatically using the debugger; in your scripts.
After that, you can control the execution flow with these buttons:
 Continue: continues code execution until we encounter another breakpoint.
 Step over: step through code line-by-line to get insights into how each line affects the variables being updated. Should your code call another function, the debugger won't jump into its code, instead stepping over so that the focus remains on the current function.
 Step into: like Step over, however clicking Step into at the function call will cause the debugger to move its execution to the first line in the functions definition.
Step out: having stepped into a function, clicking this will cause the remainder of the function definition to be run and the debugger will move its execution to the parent function.
Toggle breakpoints: toggles breakpoints on/off while leaving their enabled states intact.
Pro tips:
1. Make sure you understand your codes and logic before using breakpoints.
2. 
Too many breakpoints is a very bad idea!
3. 
A detailed guide to use the breakpoints will be available in another post.

2. Master the console API

The Console API is a collection of methods, which was defined by Chrome Dev Tools. It can be accessed via the global console object, to log all kinds of information you need: a property value, an entire object, or even a DOM element. These information are displayed in the Console tab of Chrome Dev Tools.
While there're a lot of useful methods in the Console API, the below methods are definitely the most popular:

console.log

This method takes one or more expressions as parameters and writes their current values to the console.
Console.Log

console.dir

console.dir() displays all the properties of an object. You can also log an element's JavaScript representation.
Console.Dir

console.table

Display formatted information of arrays and objects as tables. Columns can be sorted, too.
Console.Table()

console.time

Using together with console.timeEnd() to start and stop a timer (identified by a string label). Time is logged in millisecond.
Console.Time

console.trace

Output a stack trace from the point where the method was called, including links to the specific lines in the script source. A blue counter on the left indicates the number of times that method was invoked at that point.
Console.Trace

3. De-minify or prettify your codes

Minified Javascript is intentionally made for machines, not for humans. But, sometimes, you have to dig in the minified codes to track down bugs. If you are reading in the Source tab of Chrome Dev Tools, a pretty printing option is available to make your life easier. Just click on the curly brace  ("Pretty Print") icon in the bottom left corner, the JavaScript is transformed into a more human readable form. This is more easy for debugging and setting breakpoints as well.
Before Pretty Print
After Pretty Print

4. Live edit scripts while running (locally)

Dev Tools allows you to edit script files and run them locally. Just clicking the file you want in the Resources tab, making modifications and Save/Save as with Ctrl+S.

Authored by Karmi Phúc. Reference: https://developers.google.com/chrome-developer-tools/

Popular Posts