background img

Dedicated to Google and Google products. Curated by Karmi Phúc.

Showing posts with label google docs. Show all posts
Every year, phones and tablets get better, and more of you are starting to use your mobile devices not just to view, but also to create and edit content. And while the Drive app is a convenient place to store your stuff, we want to make it easier for you to quickly find, edit and create documents, spreadsheets, and presentations on the go. Starting today, you can download new, standalone mobile apps for Docs and Sheets—with Slides coming soon. Need to find a spreadsheet? Go to the Sheets app. Need to create a document? Go to the Docs app. They're all right there at your fingertips.

When you open the new apps, you'll see your most recently edited files, which means less time searching and scrolling.

The apps also come with offline support built in, so you can easily view, edit and create files without an Internet connection. Now, if you have a brilliant idea for a best-selling novel while traipsing through the Amazonian rainforest (or you know, something more probable, like during flight takeoff)...no problem. You can jot down your idea in the Docs app on your phone, even when you're offline.

You can get the apps on Google Play [Docs] [Sheets] and in the App Store [Docs] [Sheets]. If you don't have time now, over the next few days you'll be prompted to download the apps when you go to edit or create a document or spreadsheet in your Drive app. And of course, you'll still be able to use the Drive app to view and organize all of your documents, spreadsheets, presentations, photos and more.

So enjoy the Amazon—we're looking forward to buying that novel someday. And in the meantime, just remember: even if a crocodile eats your phone, your files are safe in the cloud!


Source: http://googleblog.blogspot.com/2014/04/new-mobile-apps-for-docs-sheets-and.html

New mobile apps for Docs, Sheets and Slides—work offline and on the go

Every year, phones and tablets get better, and more of you are starting to use your mobile devices not just to view, but also to create and edit content. And while the Drive app is a convenient place to store your stuff, we want to make it easier for you to quickly find, edit and create documents, spreadsheets, and presentations on the go. Starting today, you can download new, standalone mobile apps for Docs and Sheets—with Slides coming soon. Need to find a spreadsheet? Go to the Sheets app. Need to create a document? Go to the Docs app. They're all right there at your fingertips.

When you open the new apps, you'll see your most recently edited files, which means less time searching and scrolling.

The apps also come with offline support built in, so you can easily view, edit and create files without an Internet connection. Now, if you have a brilliant idea for a best-selling novel while traipsing through the Amazonian rainforest (or you know, something more probable, like during flight takeoff)...no problem. You can jot down your idea in the Docs app on your phone, even when you're offline.

You can get the apps on Google Play [Docs] [Sheets] and in the App Store [Docs] [Sheets]. If you don't have time now, over the next few days you'll be prompted to download the apps when you go to edit or create a document or spreadsheet in your Drive app. And of course, you'll still be able to use the Drive app to view and organize all of your documents, spreadsheets, presentations, photos and more.

So enjoy the Amazon—we're looking forward to buying that novel someday. And in the meantime, just remember: even if a crocodile eats your phone, your files are safe in the cloud!


Source: http://googleblog.blogspot.com/2014/04/new-mobile-apps-for-docs-sheets-and.html

Google Slides and Google Drawings now let you crop images. You can even crop them to fit a shape like a donut, a smiley face, a star, an arrow and more. This is called a mask and you can choose various shapes, arrows, callouts or equations.

Just select an image and click the "crop" button from the toolbar to crop an image. "Drag and drop the the blue handles until the image has been cropped the way you want. A shadow of the original image will be present to help you see how much you are cropping. Click Enter on your keyboard or click back onto your slide to save the cropped image," explains Google. To fit the image into a specific shape, select it, click the arrow next to the crop button and choose a shape.


You can also add a border to your image: click the line weight icon and change the line color.


Here's an example from Google Drawings that uses the double brace mask:


Source: http://googlesystem.blogspot.com/2014/03/crop-images-in-google-slides-and-google.html

Crop Images in Google Slides and Google Drawings

Google Slides and Google Drawings now let you crop images. You can even crop them to fit a shape like a donut, a smiley face, a star, an arrow and more. This is called a mask and you can choose various shapes, arrows, callouts or equations.

Just select an image and click the "crop" button from the toolbar to crop an image. "Drag and drop the the blue handles until the image has been cropped the way you want. A shadow of the original image will be present to help you see how much you are cropping. Click Enter on your keyboard or click back onto your slide to save the cropped image," explains Google. To fit the image into a specific shape, select it, click the arrow next to the crop button and choose a shape.


You can also add a border to your image: click the line weight icon and change the line color.


Here's an example from Google Drawings that uses the double brace mask:


Source: http://googlesystem.blogspot.com/2014/03/crop-images-in-google-slides-and-google.html

Screen Shot 2014-01-15 at 3.31.33 AM. ​

Google mới đây đã bổ sung thêm một tính năng mới cho ứng dụng Google Drive nền web, cho phép người dùng có thể theo dõi và xem lại lược sử của tất cả quá trình chỉnh sửa, quản lý file. Theo đó, khi vào Google Drive, nhìn lên phía trên ở góc phải, bạn sẽ thấy một chữ (i), khi bấm vào thì nó sẽ hiện ra một cột hiển thị toàn bộ các thao tác liên quan đến file đó. Ví dụ như nó sẽ cho bạn biết ai đã chỉnh lại nội dung trong tài liệu, ai đã đổi tên file, ai thêm file mới vào, ai vừa nhận xét về nội dung file đó. Điều này là vô cùng có ích, đặc biệt là với những bạn hay chia sẻ tài liệu cho nhiều người thông qua Google Drive, với tính năng này, bạn sẽ có thể quản lý, biết được những ai đã tương tác với file đó. Google cho biết họ sẽ phổ biến chức năng này đến với toàn bôi người dùng Google Drive nền web trong vòng vài tuần nữa.

activity. ​


Source: http://www.tinhte.vn/threads/google-drive-duoc-cap-nhat-tinh-nang-cho-phep-theo-doi-tat-ca-qua-trinh-chinh-sua-quan-ly-file.2239151/

Google Drive được cập nhật tính năng cho phép theo dõi tất cả quá trình chỉnh sửa, quản lý file

Screen Shot 2014-01-15 at 3.31.33 AM. ​

Google mới đây đã bổ sung thêm một tính năng mới cho ứng dụng Google Drive nền web, cho phép người dùng có thể theo dõi và xem lại lược sử của tất cả quá trình chỉnh sửa, quản lý file. Theo đó, khi vào Google Drive, nhìn lên phía trên ở góc phải, bạn sẽ thấy một chữ (i), khi bấm vào thì nó sẽ hiện ra một cột hiển thị toàn bộ các thao tác liên quan đến file đó. Ví dụ như nó sẽ cho bạn biết ai đã chỉnh lại nội dung trong tài liệu, ai đã đổi tên file, ai thêm file mới vào, ai vừa nhận xét về nội dung file đó. Điều này là vô cùng có ích, đặc biệt là với những bạn hay chia sẻ tài liệu cho nhiều người thông qua Google Drive, với tính năng này, bạn sẽ có thể quản lý, biết được những ai đã tương tác với file đó. Google cho biết họ sẽ phổ biến chức năng này đến với toàn bôi người dùng Google Drive nền web trong vòng vài tuần nữa.

activity. ​


Source: http://www.tinhte.vn/threads/google-drive-duoc-cap-nhat-tinh-nang-cho-phep-theo-doi-tat-ca-qua-trinh-chinh-sua-quan-ly-file.2239151/

blogAccessibility
Like many web professionals, I use Google Docs every day to create and share information. It's a fantastic suite of tools that's perfect for collaborating with your coworkers and interacting with clients. In fact, I think mastering Google Docs has become an essential professional skill.
At Treehouse, we use Google Docs documents and spreadsheets for everything from writing video scripts to analyzing data and statistics. I'm always looking for new tips and exploring the menus, because in a tool that I use every day, small efficiencies can add up to big time savings. In this post, I'll share a few uncommon Google Docs tips I've learned over the last few years that will make you into a document-wrangling, cowboy-ninja, spreadsheet-wizard… person.

1. Show all keyboard shortcuts.

Using the mouse to click on things may feel easy, but it's slow. Keyboard shortcuts are one of the fastest ways to get better at any piece of software (especially StarCraft). Whether you're viewing a spreadsheet, a doc, or you're in the list of documents, you can bring up a full list of shortcut keys. Just use the following (you guessed it) keyboard shortcut:
  • On Mac, press ⌘ + /
  • On Windows, press Ctrl + /
When you hit these keys, you should get a contex tual overlay that gives you the hotkeys for the current view; they're different for each app. It looks something like this:

2. Use Gmail shortcuts in the list view.

If you've mastered the shortcuts in either Gmail or the Google Docs list view, then you've actually mastered both. When you're traversing lots of documents, it's often helpful to make some bulk edits or star some documents to find them quickly later.
Here are the most important keys for navigating the list view:
  • J  Navigate to the next item in the list
  • K  Navigate to the previous item in the list
  • X  Select/unselect an item
  • S  Star/unstar an item

3. Free yourself from distraction and edit fullscreen.

If you need to stay hyper-focused on a document in a distraction free environment, this is for you. In a document, go to the View menu and select the Full screen option.
A screenshot of the View menu in Google docs
The controls will disappear so that you can focus on your content. I recommend setting your browser to full screen for maximum effect. To get out of fullscreen mode, simply press the Esc key.

4. Hack the custom header styles to quickly add formatting.

When you're editing a Google document, it's helpful to create headings so that each section of your writing is clearly defined. The default headings are good for most purposes, but if you frequently need to apply special formatting, you can make your own "headings" and apply them to any inline text. For example, I use the special headings to highlight parts of Treehouse video scripts that include motion graphics, special camera moves, blocking, and computer code.
A screenshot of the Title menu in Google Docs.
To create a new header style, simply format your text how you'd like and highlight it. Then go to the Title menu, click one of the right facing arrows next to a header, and select Update 'heading X' to match with X being the header number.
Then, when you need to apply the same formatting, you can simply set the text to o ne of the title styles in the menu as you would normally.
Note: This will only apply to one document at a time, so don't worry about 'messing up' the default styles for other documents or other people in your organization.

5. Get started with a template.

Google maintains a directory of templates that you can use to get a jump start on your next document. There's a pretty huge selection and it's easy to filter and sort. Whether you're setting up a personal finance spreadsheet or writing a resume and cover letter, there's probably a template in there that can seriously cut down on your setup time.

6. Automagically create a table of contents.

When I create outlines for new courses on Treehouse, the documents tend to get pretty lengthy. Fortunate ly, if you structure your document using the various header levels in the Title menu, Google Docs can automatically generate a table of contents for you. This TOC allows you to jump to any part of the document, making navigation quick and easy for long documents.
In a document with several headings, place your insertion point at the top of the document. Then, go to the Insert menu and click Table of contents to add a TOC. Here's a picture of the finished result:
Screenshot of a Google Docs table of contents.
Note: This probably won't work properly if you use the header hack in tip 4 to format inline text. I only use TOCs for creating outlines and not scripting videos.

7. Use conditional formatting to color spreadsheets.

Maybe y ou're not surprised that spreadsheets in Google Docs are capable of coloring cells based on conditional formatting. Yet for some reason, very few people know about this feature when I tell them. If you're working with numerical data or dates, coloring cells can help you quickly distill and comprehend large datasets.
I created an example data set that represents a traditional classroom with test scores (and in the process, I also learned about the random number generators in the function list). Let's say you're a teacher, and you want to visually identify students that scored 75 or below on a test. To do this, hover over the column header and click the arrow icon that appears to bring up a menu. Then click the Conditional formatting… option towards the bottom.
Note: In the image below, there are numbers in column B that are covered by the menu.
Screenshot of the conditional formatting menu in Google spreadsheets.
When the conditional formatting modal appears, you can add rules that will color the cells. In the image below, you can see what these rules look like for our example. Any numbers at 75 or below will be highlighted in yellow. Everything else will be green.
Screenshot of the conditional formatting modal in Google spreadsheets.
Here's what the data looks like with the added color. Even better, when we sort Column B, we'll see a visual that depicts the ratio between low scores and high scores. The block of yellow cells will be set against the block of green cells. Conditional formatting is like a grappling hook for climbing the DIKW Pyramid. It's a tool that can help you make the leap from data to useful information.
Screenshot of a Google spreadsheet with conditionally formatted cells.

8. Extrapolate sets of related terms.

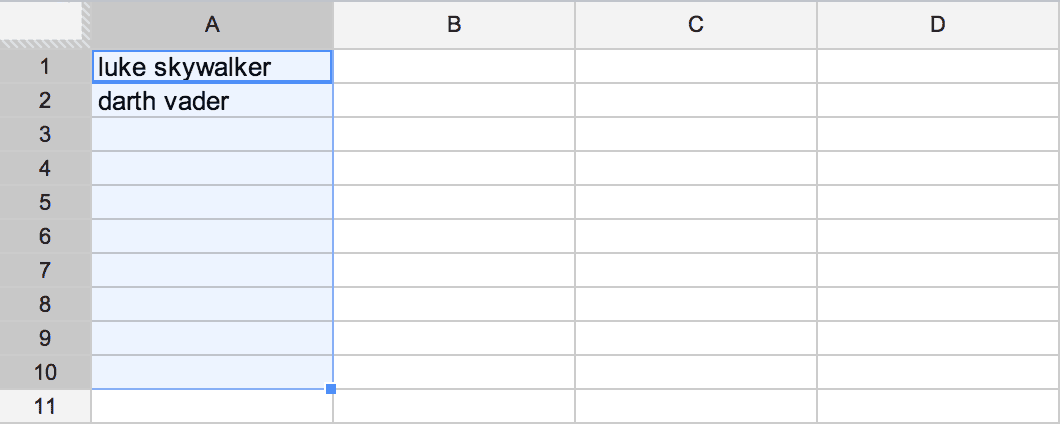
Are you ready for some magic? Google spreadsheets allows you to take two cells and find other related terms. First, fill two cells with related items and highlight them, like so:
A screenshot of a Google spreadsheet that says luke skywalker and darth vader in the first two cells.
Now we need to drag out the set. On a Mac, hold down option. On a PC, hold down Ctrl. While holding down the modifier key, click on the small blue box in the bottom right corner of the highlighted cells, and drag downwards.
sets-02
Google will fill in other related terms. In this case, Google magically filled in the remaining cells with other Star Wars characters. It's not perfect, but it works pretty well for most things. From what I understand, this technology is what's left of Google Sets, a defunct Google Labs project.
sets-03
It's hard for me to say exactly how you can use this one, but it's definitely a fun curiosity that's helped me brainstorm related ideas in sort of a fuzzy mind-mapping fashion. I'm hoping to see some clever ideas in the comments!


Source: http://blog.teamtreehouse.com/8-google-docs-tips-you-may-not-have-known-about

8 Google Docs Tips You May Not Have Known About

blogAccessibility
Like many web professionals, I use Google Docs every day to create and share information. It's a fantastic suite of tools that's perfect for collaborating with your coworkers and interacting with clients. In fact, I think mastering Google Docs has become an essential professional skill.
At Treehouse, we use Google Docs documents and spreadsheets for everything from writing video scripts to analyzing data and statistics. I'm always looking for new tips and exploring the menus, because in a tool that I use every day, small efficiencies can add up to big time savings. In this post, I'll share a few uncommon Google Docs tips I've learned over the last few years that will make you into a document-wrangling, cowboy-ninja, spreadsheet-wizard… person.

1. Show all keyboard shortcuts.

Using the mouse to click on things may feel easy, but it's slow. Keyboard shortcuts are one of the fastest ways to get better at any piece of software (especially StarCraft). Whether you're viewing a spreadsheet, a doc, or you're in the list of documents, you can bring up a full list of shortcut keys. Just use the following (you guessed it) keyboard shortcut:
  • On Mac, press ⌘ + /
  • On Windows, press Ctrl + /
When you hit these keys, you should get a contex tual overlay that gives you the hotkeys for the current view; they're different for each app. It looks something like this:

2. Use Gmail shortcuts in the list view.

If you've mastered the shortcuts in either Gmail or the Google Docs list view, then you've actually mastered both. When you're traversing lots of documents, it's often helpful to make some bulk edits or star some documents to find them quickly later.
Here are the most important keys for navigating the list view:
  • J  Navigate to the next item in the list
  • K  Navigate to the previous item in the list
  • X  Select/unselect an item
  • S  Star/unstar an item

3. Free yourself from distraction and edit fullscreen.

If you need to stay hyper-focused on a document in a distraction free environment, this is for you. In a document, go to the View menu and select the Full screen option.
A screenshot of the View menu in Google docs
The controls will disappear so that you can focus on your content. I recommend setting your browser to full screen for maximum effect. To get out of fullscreen mode, simply press the Esc key.

4. Hack the custom header styles to quickly add formatting.

When you're editing a Google document, it's helpful to create headings so that each section of your writing is clearly defined. The default headings are good for most purposes, but if you frequently need to apply special formatting, you can make your own "headings" and apply them to any inline text. For example, I use the special headings to highlight parts of Treehouse video scripts that include motion graphics, special camera moves, blocking, and computer code.
A screenshot of the Title menu in Google Docs.
To create a new header style, simply format your text how you'd like and highlight it. Then go to the Title menu, click one of the right facing arrows next to a header, and select Update 'heading X' to match with X being the header number.
Then, when you need to apply the same formatting, you can simply set the text to o ne of the title styles in the menu as you would normally.
Note: This will only apply to one document at a time, so don't worry about 'messing up' the default styles for other documents or other people in your organization.

5. Get started with a template.

Google maintains a directory of templates that you can use to get a jump start on your next document. There's a pretty huge selection and it's easy to filter and sort. Whether you're setting up a personal finance spreadsheet or writing a resume and cover letter, there's probably a template in there that can seriously cut down on your setup time.

6. Automagically create a table of contents.

When I create outlines for new courses on Treehouse, the documents tend to get pretty lengthy. Fortunate ly, if you structure your document using the various header levels in the Title menu, Google Docs can automatically generate a table of contents for you. This TOC allows you to jump to any part of the document, making navigation quick and easy for long documents.
In a document with several headings, place your insertion point at the top of the document. Then, go to the Insert menu and click Table of contents to add a TOC. Here's a picture of the finished result:
Screenshot of a Google Docs table of contents.
Note: This probably won't work properly if you use the header hack in tip 4 to format inline text. I only use TOCs for creating outlines and not scripting videos.

7. Use conditional formatting to color spreadsheets.

Maybe y ou're not surprised that spreadsheets in Google Docs are capable of coloring cells based on conditional formatting. Yet for some reason, very few people know about this feature when I tell them. If you're working with numerical data or dates, coloring cells can help you quickly distill and comprehend large datasets.
I created an example data set that represents a traditional classroom with test scores (and in the process, I also learned about the random number generators in the function list). Let's say you're a teacher, and you want to visually identify students that scored 75 or below on a test. To do this, hover over the column header and click the arrow icon that appears to bring up a menu. Then click the Conditional formatting… option towards the bottom.
Note: In the image below, there are numbers in column B that are covered by the menu.
Screenshot of the conditional formatting menu in Google spreadsheets.
When the conditional formatting modal appears, you can add rules that will color the cells. In the image below, you can see what these rules look like for our example. Any numbers at 75 or below will be highlighted in yellow. Everything else will be green.
Screenshot of the conditional formatting modal in Google spreadsheets.
Here's what the data looks like with the added color. Even better, when we sort Column B, we'll see a visual that depicts the ratio between low scores and high scores. The block of yellow cells will be set against the block of green cells. Conditional formatting is like a grappling hook for climbing the DIKW Pyramid. It's a tool that can help you make the leap from data to useful information.
Screenshot of a Google spreadsheet with conditionally formatted cells.

8. Extrapolate sets of related terms.

Are you ready for some magic? Google spreadsheets allows you to take two cells and find other related terms. First, fill two cells with related items and highlight them, like so:
A screenshot of a Google spreadsheet that says luke skywalker and darth vader in the first two cells.
Now we need to drag out the set. On a Mac, hold down option. On a PC, hold down Ctrl. While holding down the modifier key, click on the small blue box in the bottom right corner of the highlighted cells, and drag downwards.
sets-02
Google will fill in other related terms. In this case, Google magically filled in the remaining cells with other Star Wars characters. It's not perfect, but it works pretty well for most things. From what I understand, this technology is what's left of Google Sets, a defunct Google Labs project.
sets-03
It's hard for me to say exactly how you can use this one, but it's definitely a fun curiosity that's helped me brainstorm related ideas in sort of a fuzzy mind-mapping fashion. I'm hoping to see some clever ideas in the comments!


Source: http://blog.teamtreehouse.com/8-google-docs-tips-you-may-not-have-known-about

Popular Posts